Using Vuser Functions in GUI Vuser Scripts

This section lists the Vuser functions that you can use to enhance your GUI user scripts.

declare_rendezvous: Declares a rendezvous.

declare_transaction :Declares a transaction.

end_transaction :Marks the end of a transaction for performance analysis.

error_message: Sends an error message to the Controller.

get_host_name: Returns the name of a load generator.

get_master_host_name :Returns the name of the Controller load generator.

lr_whoami :Returns information about the Vuser executing the script.

output_message: Sends a message to the Controller.

rendezvous: Sets a rendezvous point in a Vuser script.

start_transaction: Marks the beginning of a transaction for performance analysis.

user_data_point: Records a user-defined data sample

Serialization methods used in FLEX Protocol in LoadRunner 11.52

Recording settings

A. Use only a single protocol - FLEX
B. In the recording settings ensure the following options:


1. Use URL based recording mode
2. Under Flex Configuration check the box
– Do not serialize externalizable objects.
3. Set Port mapping as WinInet level.
C. Disable Flex RTMP node (Used during video streaming)
Serialization in Flex scripts
A. UseGraniteDS configuration:

Defines the server side Data Service configuration. If you select this option, do not select Use Flex LCDS/BlazeDS jars to serialize the messages. Ensure that the granit-config.xml file matches the one deployed on the server.

B. Using External Java Serializer:

You can use the Java classes from the Flex server to serialize AMF messages in your script. This process has been simplified

so that you need to include the application JAR files only if the AMF objects implement an externalizable interface.

1. In the Recording Options > Flex > Externalizable Objects node, select Serialize objects using and select Custom Java Classes from the menu.

2. Add the relevant files by using the Add all classes in folder or Add JAR or Zip file buttons. Add the following files:

1. For Adobe BlazeDS or Adobe LCDS, add the following JAR files:

flex-messaging-common.jar

flex-messaging-core.jar

2. Regenerate the script and note any errors. Open the recording options dialog box using the Generation

Options button and add the necessary application JAR files.


3. Ensure that the added files exist in the same location both on the VuGen machine and on all load generators. The Limitations for

the Java Serializer are it Supports JDK versions 1.6 and earlier, Supported servers are Adobe BlazeDS and Adobe Livecycle DS,

Microsoft .NET classesare not supported. During code generation VuGen performs a validity test of the request buffers by

verifying that the buffer can be read and written using the provided jars. Failure in this validity test indicates that

the classes are incompatible with LoadRunner.

C. LoadRunner Serializer:

You can attempt to serialize externalizable objects using the LoadRunner serializer. Ensure that you

have saved all open scripts because this option may result in unexpected errors or invalid steps.

Apache Tomcat Server

Tomcat is an HTTP server. Tomcat is also a servlet container that can execute Java Servlet, and converting JavaServer Pages (JSP) and JavaServerFaces (JSF) to Java Servlet. Tomcat employs a hierarchical and modular architecture as illustrated in the diagram below,

Apache Tomcat is a Java-capable HTTP server, which could execute special Java programs known as Java Servlet and Java Server Pages (JSP). It is the official Reference Implementation (RI) for Java Servlets and JavaServer Pages (JSP) technologies. Tomcat is an open-source project, under the ”Apache Software Foundation” (which also provides the most use, open-source, industrial-strength Apache HTTP Server). The mother site for Tomcat is http://tomcat.apache.org. Alternatively, you can find tomcat via the Apache mother site @ http://www.apache.org.

Tomcat was originally written by James Duncan Davison (then working in Sun), in 1998, based on an earlier Sun’s server called Java Web Server (JWS). It began at version 3.0 after JSWDK 2.1 it replaced. Sun subsequently made Tomcat open-source and gave it to Apache.

Tomcat is an HTTP application runs over TCP/IP. In other words, the Tomcat server runs on a specific TCP port in a specific IP address. The default TCP port number for HTTP protocol is 80, which is used for the productionHTTP server. For test HTTP server, you can choose any unused port number between 1024 and 65535.

Architecture:

LOAD DISTRIBUTION IN JMETER TEST PLAN

Distribute concurrent users using following Thread Groups
  1. Ultimate Thread Group
  2. Stepping Thread Group
  3. Throughput Controller
1.) Ultimate Thread Group


infinite number of schedule records
separate ramp-up time, shutdown time, flight time for each schedule record

Let’s configure Ultimate Thread Group as following:


2.) Stepping Thread Group:


preview graph showing estimated load (see example screen below)
initial thread group delay to combine several thread group activities
increase load by portions of threads (users) with ramp-up period
configurable hold time after all threads started
decrease load by portions

Following screenshot shows Stepping Thread Group set to generate load increasing by 10 users each 2 minutes:


3.) Throughput Controller:


The Throughput Controller allows the user to control how often it is executed. There are two modes – percent execution and total executions. Percent executions cause the controller to execute a certain percentage of the iterations through the test plan. Total executions cause the controller to stop executing after a certain number of executions have occurred. Like the Once Only Controller, this setting is reset when a parent Loop Controller restarts.

Load Distribution (Transaction-1)


Load Distribution (Transaction -2)


Load Distribution (Transaction -3)


Load Distribution (Transaction -4)


Load Distribution (Transaction -5)


Sample out

Apache JMeter Tool

The Apache JMeter™ desktop application is open source software, a 100% pure Java application designed to load test functional behavior and measure performance. It was originally designed for testing Web Applications but has since expanded to other test functions.

What can I do with it? 


Apache JMeter may be used to test performance both on static and dynamic resources (Files, Web dynamic languages - PHP, Java, ASP.NET, etc. -, Java Objects, Data Bases and Queries, FTP Servers and more). It can be used to simulate a heavy load on a server, group of servers, network or object to test its strength or to analyze overall performance under different load types. You can use it to make a graphical analysis of performance or to test your server/script/object behavior under heavy concurrent load.
What does it do?

Apache JMeter features include: 
  • Ability to load and performance test many different server/protocol types:
  • Web - HTTP, HTTPS
  • SOAP
  • FTP
  • Database via JDBC
  • LDAP
  • Message-oriented middleware (MOM) via JMS
  • Mail - SMTP(S), POP3(S) and IMAP(S)
  • MongoDB (NoSQL)
  • Native commands or shell scripts
  • TCP
  • Complete portability and 100% Java purity .
Full multithreading framework allows concurrent sampling by many threads and simultaneous sampling of different functions by separate thread groups.Careful GUI design allows faster Test Plan building and debugging.
Caching and offline analysis/replaying of test results.

Highly Extensible core:
Pluggable Samplers allow unlimited testing capabilities.Several load statistics may be choosen with pluggable timers .
Data analysis and visualization plugins allow great extensibility as well as personalization.Functions can be used to provide dynamic input to a test or provide data manipulation.Scriptable Samplers (BeanShell, BSF-compatible languages and JSR223-compatible languages)

Mobile Performance Testing Checklist

Smartphones & tablets are the reality and a large mass of people are moving to use it for business applications, entertainment, social networking, healthcare applications etc. It’s mandatory for businesses to assess performance of mobile apps before releasing it to public. Responsiveness of mobile apps is one of the big factor for organization to capture the market.

Below are list of things to consider specific to mobile performance testing.
  • Client side considerations 
  • Application performance against different mobile phones in the market? 
  • CPU utilization 
  • Memory utilization 
  • I/O 
  • Cache size availability 
  • Rendering (2D / 3D) 
  • Application performance against different mobile phones & browsers in the market? 
  • JS Engine processing 
  • Number of threads executing the requests 
  • Memory leakage by the application? 
  • Battery consumption by the application? 
  • Internet data usage by the application? 
  • Offline data usage by the application? 
  • Different sizes of images for different mobile phones? 
  • Analyzing waterfall chart for the mobile traffic? 
  • Compressed data 
  • Caching (HTML5 Web Storage) 
  • Less number of round trips 
  • Image size 
  • Consolidating resources? Server side considerations 
  • Analyzing impact on server resources (cpu, memory, i/o) due to slow data transfer rate from server to mobile devices? 
  • Simulating scenarios, when user moving from Wi-fi to 3G, 4G etc? 
  • Simulating scenarios where connections are getting dropped? 
  • Simulating slow sessions and always connected? 
  • Simulating large number of active sessions for a longer time? 
  • Simulating unidirectional server updates? 
  • Simulating large data transfer between server and client? 
  • Static resources being served from CDNs or proxies? 
  • Simulating traffic from different regions / cities? 
  • Simulating different network characteristics? 
  • Latency 
  • Packet Loss 
  • Jitter 
  • Bandwidth (2G, 3G, Wifi, etc.) 
  • Simulating web based application’s scenarios? 
  • Simulating native application’s scenarios? 
  • Simulating hybrid application’s scenarios? 
  • Simulating secure web based application? 
  • Simulating secure native application?

PREPARE JMETER REPORTS USING EXCEL MACRO’S

First of all you need to enable macro developer option in excel.For this follow the below steps
1. Click on Office button which is loacted at the top left corner
2. Go to Excel Options
3. Go to the tab Popular
4. Check “Show Developer Tab in Ribbon” (3rd Check box)


5. Then click ok.
6. You can see the new developer tab in the excel sheet.Click Developer tab a new Visual Basic, a new Microsoft Visual Basic for applications window will be displayed


7. ClickInsert Module, and enter the following code into the Module and save


Lets say for example
Convert milliseconds to seconds
Sub ConvertTOSec()
Dim cnt As Integer
cnt = ActiveSheet.UsedRange.Rows.Count
For Each c In ActiveSheet.Range(“C2:J” & cnt)
c.Value = c.Value / 1000
Next c
End Sub

Formatting specified cells

Sub TC_formattingCells ()
Columns(“C:J”).Select
Selection.NumberFormat = “0.00″
Range(“I:I,J:J”).Select
Range(“J1″).Activate
Selection.Delete Shift:=xlToLeft
Range(“M8″).SelectActiveWorkbook.Save
End Sub

8. Click on Macro option
9. Select macro and Run


Here is the sample Jmeter report


Output of sample macro report

Converted milliseconds to seconds.


2.) Combine multiple workbooks to one master workbook using macro

1. Put all the workbooks that you want to combine into the same directory. See screenshot:


2. Launch an Excel file that you want to combine other workbooks into.

3. Click Developer > Visual Basic, a new Microsoft Visual Basic for applications window will be displayed, clickInsert > Module, and input the following code into the Module:


Sub GetSheets()

Path = “D:\AggreageResults_13012014 \”

Filename = Dir(Path & “*.csv”)

Dim i As Integer

Do While Filename <> “”

Workbooks.Open Filename:=Path & 

Filename, ReadOnly:=True
i = i + 1
For Each Sheet In ActiveWorkbook.Sheets
Sheet.Copy After:=ThisWorkbook.Sheets(i)
ThisWorkbook.Sheets.Add
Next Sheet
Workbooks(Filename).Close
Filename = Dir()
Loop
End Sub

 In the above code, you can change the path to the one that you are using.
Then click button to run the code, and all of the worksheets within the workbooks have been merged into the master workbook.

Error: Communication error: The Client failed to send packet. The socket has been shut down. [MsgId: MERR-10343]​ in loadrunner

Load Runner Agent Process/service starts at port 50500 and 54345 default port for monitoring/running vuser over firewall, it is port 443.apply netstat -an on the machine and check to see if 54345 and 50500 are occupied or free. If these ports are in used when you start the agent, you will get the above error. 

You will need to shut down the application that is using those ports, so that the ports are freed before restarting Load Runner agent.

You may also get this error during replay if Load Runner agent of the host machine is connecting back to the controller using a port that is already bound. By default, this is a dynamic port and Load Runner agent will automatically try a different port.

Make sure the Load Runner Agent service is running on the Generator machine.

Verify the connectivity performing ping operation. Ping the LG from controller using name and IP and visa versa from controller to LG. Make a entry to host files mapping IP and name both in controller and LG .

How to use JavaScript in your HP LoadRunner scripts

JavaScript is rapidly becoming the driving force behind the Internet. Any website, small or large, has some parts written with JavaScript to enhance the user experience. Browser vendors constantly improve the speed in which JavaScript is parsed and executed in their browsers. This increase in speed is now to the point that it’s become one of the key benchmarks for every browser version. When we performance test a website, a web application, or even a REST service we can be sure that JavaScript plays some role in the business process we are about to test.

HP LoadRunner uses C as the native language for scripting HTTP/HTML scripts, but it allows integration and use of JavaScript code with relative ease. To learn more about this integration, consult Using the LoadRunner JavaScript Engine chapter in the HP LoadRunner User Guide.

Why would we want to use JavaScript in our script?


There are four main reasons:
JavaScript often offers a more intuitive experience which is easier to implement than in C.
The JavaScript regular expression library simplifies the challenge of working with regular expressions.


Numerous JavaScript libraries that assist with any coding task (e.g. string manipulation) are available.

Client-side logic is often implemented in JavaScript. Inserting snippets of the original JavaScript code means you don’t have to translate the JavaScript client logic into C code.

This article explores the following scenario: We are testing a web server application which is used for authentication. Our goal is to receive an authentication token from the server and use the token in all future communication with the server. The authentication process is as follows:

Send an HTTP GET request to the “/challenge” REST API to get a challenge string.
Perform some calculation on that string and generate a unique password using a proprietary encryption algorithm.
Send a GET request to the “/token” REST API passing the password generated in step 2 as a query parameter.
For this scenario we run a simple web server which serves static values (using Node.js). The server code is available as an attachment to this article (web_js_example_server.zip).

Getting the challenge string

Our first goal is to obtain the challenge string from the server. We type the following step into our script to make the required REST API call:

web_custom_request("challenge",
"URL=http://localhost:3000/challenge",
"Method=GET",
"RecContentType=application/json",
LAST);

We want to capture the server response in a parameter. To this end, we add a web_reg_save_param step before our request and save the response body into a parameter named “challenge”:

web_reg_save_param("challenge","LB=","RB=","Search=Body",LAST);

Calculating the password 

Now that we have the challenge string we can use some JavaScript manipulations to generate the password.

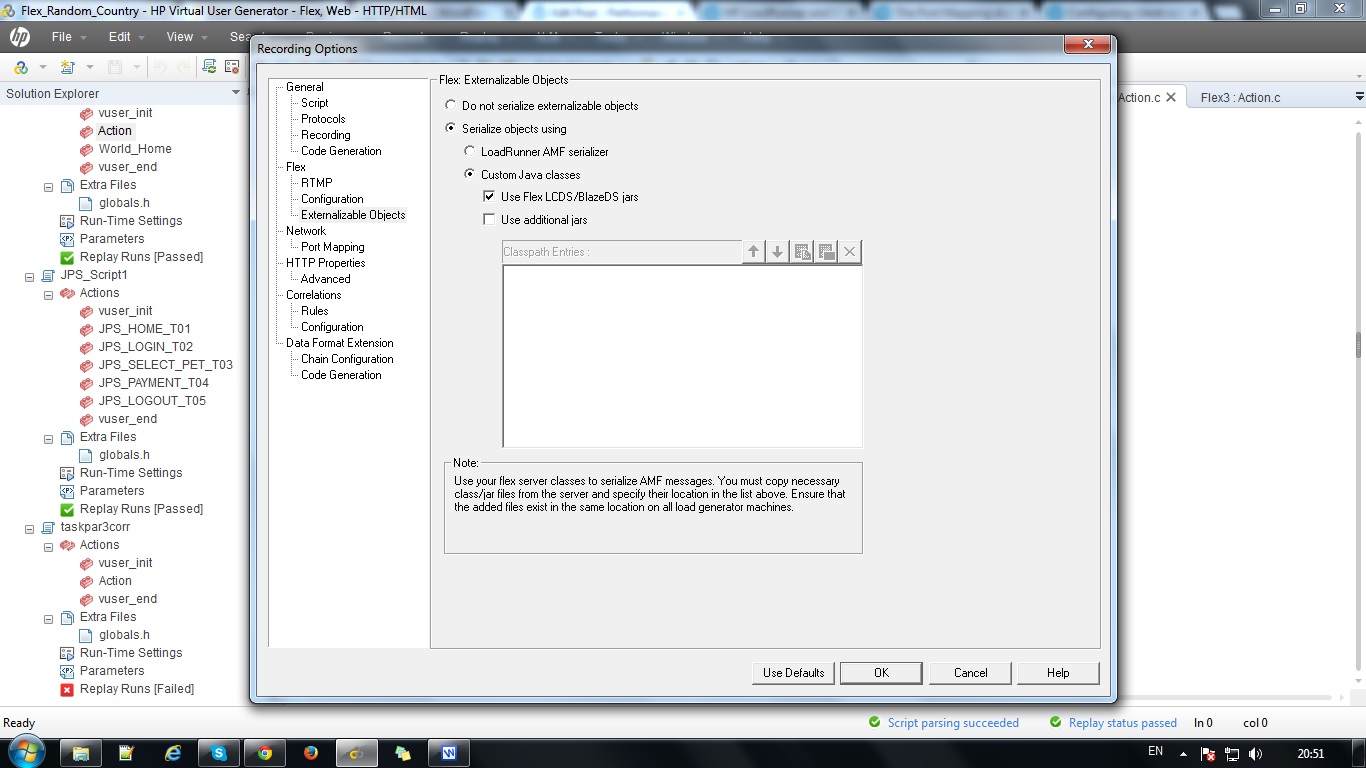
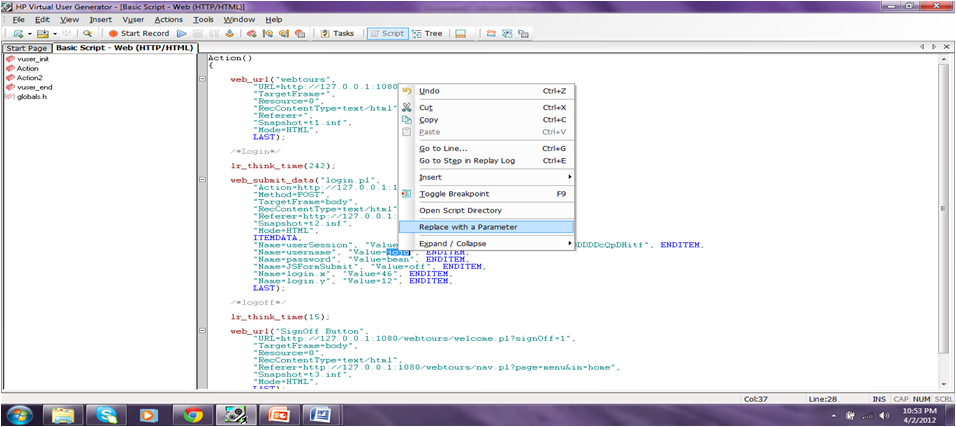
First we need to enable JavaScript for our script. To do this, open the Run-Time Settings (F4) and go to Internet Protocol > Preferences > Set advanced options. Click on Options…, and in the dialog that opens (scroll all the way down), set Enable running JavaScript code to Yes (as in the screenshot below) and then click OK on both dialogs.


Next we need to create a new JavaScript file that contains our code. Right-click the Extra Files node in the Solution Explorer and select Create new file… Name the new file calcPassword.js and press OK.

We know that the string returned by the server is a JSON object which contains an array with some strings. The last member of that array is a number which tells us the index of the string we want to extract from the array and encrypt using the proprietary algorithm. We add a new JavaScript function that extracts the value from the array.

function getPassword(stringData){
var data = JSON.parse(stringData);
var index = data[data.length - 1];
var value = data[index];
}

The required value is stored in the “value” variable, and now we have to apply the encryption function. Luckily for us, the server code is written in JavaScript since it runs on Node.js and it already has a module called crypto.js which implements the proprietary cryptographic algorithm. Import the crypto.js file into the script by right-clicking the Extra Files node in theSolution Explorer and selecting the Add files to script… option. Select the file crypto.js from our server folder (you would typically ask for this file from the R&D team). Edit the file so that it contains only the function we need (this step is not mandatory and is performed for clarity, we could use the original file):

function encrypt(data) {
return data.toString().split("").reverse().join("");
}

(I don’t recommend using this function as a real life encryption method as it only reverses the input string J)

Now we can update our getPassword function to call the encrypt function:

function getPassword(stringData){
var data = JSON.parse(stringData);
var index = data[data.length - 1];
var value = data[index];
return encrypt(value);
}

Now we just add the web_js_run step to run our JavaScript code:

web_js_run(
"Code=getPassword(LR.getParam('challenge'));",
"ResultParam=password",
SOURCES,
"File=crypto.js", ENDITEM,
"File=calcPassword.js", ENDITEM,
LAST);

The parameters are straightforward but you can always consult the product documentation if you are not sure. In this case we call the getPassword function defined in the JavaScript file. We want to pass it the parameter we got from the REST API call. We use the LR.getParam utility function (implemented in JavaScript) to pass that parameter as string to thegetPassword function. The result of the function is stored in the parameter defined by the ResultParam argument (“password” in our case). Finally we have the source files that contain our JavaScript code added as “File=…” arguments separated by the ENDITEM constant.

Obtaining the token

Our final step is obtaining the token from the server. We could just use the password parameter to create the URI, but that would be a mistake because we need to encode the URI first. We can do it easily using another web_js_run call (since JavaScript natively supports URI encoding). This time the call is quite simple:
web_js_run(
"Code='http:/'+'/localhost:3000/token?password=' + encodeURI(LR.getParam('password'));",
"ResultParam=uri",
LAST);

(Note that we split up the ‘//’ string in the ‘Code’ parameters into two separate sub-strings. If we were to pass it in as a single string “//”, LoadRunner would report error -26312, “Using "//" line comments in argument of type 'code' is illegal/unsupported”)

Now we add the step that makes the final call with the calculated URI to the appropriate 

REST API:
web_custom_request("get token",
"URL={uri}",
"Method=GET",
"RecContentType=application/json"
LAST);

The result from the server is as expected:

Action.c(25): t=1987ms: 38-byte response body for "http://localhost:3000/token?password=damhA" (RelFrameId=1, Internal ID=4)

Action.c(25): "4f6dfbce-412f-4c6c-8bac-7d7d66a6b822"

Conclusion:

Enhancing your HTTP/HTML script with JavaScript code is easy and useful. There are numerous scenarios where this capability can be employed to shorten scripting time and create a much more robust script. The HP LoadRunner User Guide is key to understanding the full potential of this feature as it includes a built in function library that links the JavaScript code to your test script’s code.

Load testing of a REST API, using HP LoadRunner’s web_custom_request

In recent years, Representational State Transfer (REST) has become a dominant model for software architecture, especially for Web-based applications. Today, most large websites and Web applications on the Internet have REST APIs. Some examples of websites using REST APIs include Twitter, Google, Flickr and so on.

The great thing about a REST API is that it is usually well-defined and therefore allows clear separation between the client logic and the server logic. This property in itself is very beneficial for both functional and load testing of the application server. In the following article we will demonstrate an easy way to test your application’s REST API using HP LoadRunner’sweb_custom_request method.

REST API Basics

Before we dive into load testing, let’s look at the basic terminology of a REST API. A REST API call consists of three major components:
The Uniform Resource Identifier (URI) – This is a string which consists of three parts. The first part contains the host (and optionally, the port) of the API call (e.g. http://www.hp.com). The second part contains the path which identifies the call functionality. This path can include some parameter values although they are distinguishable from the constants only by semantics (e.g. /users/megwhitman/type/ceo, where “megwhitman” and “ceo” are parameters while “users” and “type” are constants). The third part is the QueryString which is a list of key-value pairs (e.g. user= megwhitman & type=ceo). The pairs are separated by the “&” sign and the entire QueryString is separated from the path by the “?” sign. A full URI may look something like this: http://www.shopping.hp.com/en_US/home-office/-/products/Tablets/Tablets?SearchParameter=ElitePad
The verb – The verb can be any word describing the operation you want to perform on the URI. In HTTP, the five most commonly used verbs are: GET, POST, PUT, DELETE, and PATCH. Note that the operation for each verb is determined by the server although there are some common conventions in this area.
The payload (data) – This is the data sent to the server with the request. For example, if we want to save a text file to the server, we can send the content of the text file as the payload.

Test Case

The example application under test is a todoMVC application which manages a ‘todo’ list. This application has a REST API, as follows:
/todos, GET, No Payload – Retrieves all the todos currently in the list
/todos, POST, { isFinished :, todoText: } – Creates a new todo on the server with the text provided in the payload by the parameter.
/todos/, PUT, {id:, todoText: , isFinished:< isFinished>} – Updates the todo with id with the text and finished state < isFinished>

Note that all the data passed to and received from the server is in the JavaScript Object Notation (JSON) format which is gradually becoming the standard format for data transfer.

HP LoadRunner allows us to easily simulate HTTP calls through the web_custom_request function. We want to simulate a business process as follows:

1) Get the existing todos from the server

2) Add two new todos

3) Update the last todo added with a new text

Step 1

We use recording to ‘learn’ this step. In VuGen we create a new Web - HTTP/HTML script and record a browser opening the todoMVC application. When the application starts, it gets all the todos currently stored on the server through the GET API call. We can easily find the correct step in the recorded script by looking at the URL argument. In this case the argument is - "URL=http://localhost:3000/todos" (since the application is running locally on port 3000 on my machine). The relevant step is:

web_custom_request("todos",
"URL=http://localhost:3000/todos",
"Method=GET",
"Resource=1",
"RecContentType=application/json",
"Referer=http://localhost:3000/",
"Snapshot=t66.inf",
LAST);

The “Method” argument is the REST verb (GET in this case), and the “Snapshot” argument links to the correct snapshot file on the disk. The snapshot of this step can be viewed in the Snapshot Viewer:


We can see that the response from the server is a list of all the todos presented by our application in JSON format.

Step 2

Adding a new todo is very simple. We create our own web_custom_request step with the parameters required by thePOST REST API. The created step looks something like this:

web_custom_request("Add Todo",
"URL=http://localhost:3000/todos",
"Method=POST",
"Resource=0",
"EncType=application/json",
"Mode=HTTP",
"Body={\"isFinished\":false,\"todoText\":\"This is VuGen\"}",
LAST);

A few things to notice here:

1) The “Method” (verb) is POST as required by the REST API.

2) We specified the “EncType” parameter to inform the server that the payload is going to be in JSON format.

3) We added our payload to the “Body” parameter in JSON format.

Since writing the JSON in the middle of the script may be a bit cumbersome, we can add it as an extra file to the script. To do this simply right-click the “Extra Files” node in the Solution Explorer and select “Add Files to Script…”, and choose the data.json file we prepared earlier. On a fresh installation of LoadRunner you may need to specify the .json extension as a valid extension for extra files. You can also do this after adding the file to your script. In VuGen, select Tools > Options > Scripting > Script Management and add the .json extension to the Allowed Extensions list. Once the file is added, the project looks something like this:


Now we can add the file as our payload by specifying the BodyFilePath parameter:

web_custom_request("Add Todo from file",
"URL=http://localhost:3000/todos",
"Method=POST",
"Resource=0",
"EncType=application/json",
"Mode=HTTP",
"BodyFilePath=data.json",
LAST);

Step 3

We want to update the last todo with some new values. To do this, we use another web_custom_request with the PUTverb as specified by the REST API. This is very similar to the step that adds a new todo:

web_custom_request("Update Todo",
"URL=http://localhost:3000/todos/3",
"Method=PUT",
"Resource=0",
"EncType=application/json",
"Mode=HTTP",
"Body={\"id\":3, \"isFinished\":false,\"todoText\":\"Updated the name\"}",
LAST);

This command updates the todo with id = 3 with the string “Updated the name”.

As with the previous step, you can manage the JSON text as a file, rather than writing it directly into the script.

Conclusion

We’ve seen how easy it is to create a simple load test with a REST API using HP LoadRunner. The web_custom_requestfunction is versatile enough to cover both simple and complex cases, thus simplifying REST API testing.

What is Virtual Table Server (VTS) in HP LoadRunner 11.52

HP has announced its newer version of its flagship tool HP LoadRunner 11.52. LoadRunner 11.52 has major changes in Virtual Table Server (VTS). In this blog post, we will see about the new features of Virtual Table Server of HP LoadRunner 11.52.

Virtual Table Server is a tool that enables sharing of test data and parameters between LoadRunner Virtual Users (VUsers). Usually performance testers use parameterization in their scripts, but in Virtual Table Server it acts as centralized repository to store data which can be shared between VUsers during the test execution.

Below is the revamped design of new VTS


Virtual Table Server Admin

Differences between old VTS and new VTS
Old VTS was a windows based application. New VTS is a web based application. By default, it can been accessed using http://localhost:4000, since it is a web based, we can access it remotely and it support IE, Chrome, and Firefox browsers. It runs as windows service; during start up it will automatically starts. Basic authentication and https can be enabled to access remotely.

Old VTS utilizes memory, sometime it might crash. But in new VTS, it is disk oriented using NoSQL data engine which enables high throughput.
You need to include #include “vts2.h” statement and some manual work needs to be done like loading DLL file in each load generator machine. But in new VTS, no need to include the statement and loading DLL files.

  • New VTS has been integrated to run logic where we can control the execution. Old VTS doesn’t have such integration.
  • New VTS is now available for Linux Load generators as well.
  • New VTS now supports Unicode.
  • Data size also increased. HP has tested up to 10 million rows of data. Performance is consistent.
  • Old VTS was not supported by HP. But HP fully supports VTS.
[sociallocker][/sociallocker]

How to install/upgrade new VTS?

Install HP LoadRunner 11.52 in all machines including load generators
Install VTS on a server machine
After installation, by default VTS can be accessed using 4000 port, which can be changed.
Navigate to http://localhost:4000
On the console UI, you can import your data using SQL query or by CSV file as shown below


Virtual Table Server – Import from database
Create a C language script as shown below:

int rc = 0;
char *VtsServer = "192.168.0.100";
int nPort = 8888;

PVCI2 pvci = 0;

vuser_init()
{

pvci = lrvtc_connect(VtsServer,nPort,VTOPT_KEEP_ALIVE);
lr_log_message("pvci=%d\n", pvci);

return 0;
}

In Action.c, add some code to retrieve one column from the server and remove from the server at the same time. You can run the action multiple iterations, and it will retrieve one:

char * cname; //column name
int ret;

RetrieveMessage()
{
lr_start_transaction("retrieve_column");
rc = lrvtc_retrieve_messages1("cname",";");
lr_log_message("lrvtc_retrieve_messages1 rc=%d\n", rc);
lr_log_message("cname is %s", lr_eval_string("{cname}"));
lr_end_transaction("retrieve_column", LR_AUTO);
}

Action()
{
RetrieveMessage();
return 0;
}

In vuser_end.c, add API call to close the VTS handle:

vuser_end()
{
lrvtc_disconnect();
return 0;
}

  • You can test it in VuGen and then run it in Controller.
  • Turn on the API access port before you execute the script.
  • Like the old VTS, the new one uses 8888 as the port for API to access.
  • It is turned off by default, Navigate to the administrative UI to enable it


Sequential Random Unique Each iteration,Each occurrence in Load Runner

Creating Parameters:

In the script View, select the string and right click on it. Then, select the replace with parameter.

Type the Name of the parameter in the new opened small window / popup. You can also select it from drop down. Then, select parameter type from the parameter type list. You may select any of the available types: Date/Time, file, Group Name, Random number, Unique number, User defined function, or Vuser ID (whichever is appropriate). Next, you may select next row as:
  • Sequential
  • Random
  • Unique
  • Same line as

At last, you will need to update values on:

Each iteration - It instructs the Vuser to use a new value for each iteration
Each occurrence - It instructs the Vuser to use a new value for each occurrence of the parameter

Once - It instructs the Vuser to update the value of the parameter only once during the execution.Data wizard is a great option for Parametrization in LoadRunner.

Objectives of parameterization:

· One of the main objective of parametrization is to simulate real user behavior while running the test and we also use this to solve below problem
· Solve Date constraints that may occur during playback
1. Eg: When Second Virtual User accessing the Application user may fail because of the 2/14/99 was yesterday!]
· Solve data caching that may occur during playback
1. Eg: When Second Virtual User accessing the Application, user will get data from Cache
· Solve unique constraints that may occur during playback
Eg: Order number 1234 is already here
· Solve data dependency that may occur during playback
· Emulate real user activity
Exercise the server (Some times when we are searching with same keyword, the request will not go to database and it will get the data from the webserver cache and it will not exercise the server. Parameterization will solve this problem)

How to create Parameters:

· Right click on the value and select “Replace with parameter” where we need to execute with different set of values.


· On the new window opened just give the Parameter name as user defined variable and Parmeter typeàselect any one from the drop down and Original Value will be default value and click on properties


· After clicking on properties new window will be opened then click on Edit with notepad button and enter some list of values.
Note: After entering values in notepad keep the cursor in new line and save the notepad and close it.


· After entering the different set of values we have to customize the parameter properties to execute the script as user’s perspective.
Parameter Customization:

1. Select Columnà By Number
àBy Name

These values are used when we have multiple columns in the same table with the same parameter type. We can select for each parameter by number as column number or by name as column name.


2. File Formatà Column Delimiter
  • First Data Line
Column Delimiter drop down has values Comma,Tab,Space which are used to separate multiple columns.

First Data Line is a number which it uses that number row data at the time of execution. For eg: if you increase the number to 2 by using up button then the execution starts from 2nd row data.
3. Select Next Row à Sequential
  • Random
  • Unique

Update Value on à Each Iteration
  •  Each Occurrence
  • Once


If you select Select Next Row as Sequential and Update Value On as Each iteration then the users will execute the data sequentially for each iteration.

Click on close button and press CTRL+L buttons then parameter properties window will open with all parameters in left side and right side parameters data window.

If you click on Simulate Parameter button and then enter the iterations in check box and then click on simulate button then we will get the user behavior when the time of execution how the parameters will pass to the vusers.


If you select Update value on as Each Occurrence we can not simulate the parameter.

If you select Update value on as Once then the vuser will take only one set of data for all vusers. For ex: In the above snapshot we will get jojo and bean for each and every vuser we execute.

If you select Select Next Row as Random and Update value on as Each iteration then the user will pick random data for each and every iteration. At that we have to select for one parameter these values and select Same line as that parameter name for remaining parameters

For Ex: If we select RandomàEach iteration for Username then we have to select Same line as username for password.

If you select Select Next Row as Unique and Update value on as Each Iteration or Each Occurrence then automatically When Out of Values and Allocate Vuser values in the controller will be enabled.

When Out Of Valuesà Abort Vuser
  •  Continue in a cyclic manner
  • Continue with last value

Allocate Vuser values in the controller(Radio Buttons):

Automatically allocate block size
Allocate ______ values for each vuser


If you have values less than vusers at that time we have to select UniqueàEach IterationàAbort Vuser then what ever the users extra are aborted from the execution.
OR

We can select UniqueàEach IterationàContinue in a cyclic manner

OR

We can select UniqueàEach IterationàContinue with last value

And we can select any of the two radio buttons for Allocate vuser values in the controller in the above three different cases

If you select Unique Each Occurrence only
Allocate ______ values for each vuser will be enabled for all the three cases

And you can click on Simulate Parameter button for each and every different options customized to view how the vuser behavior.

If you select Uniqueà Once all the vusers will execute with one set of data.
Once parameterization is done click on close button. Test the data execution procedure in the form of iterations in VUGen.

Action files in Loadrunner

The requests which agents on host machines issue to application servers are specified by a playback of actions created by the Vuser User Generator (VuGen.exe).
LoadRunner creates new scripts with three sections:


vuser_init: Most of the initiation operations are done with vuser_init action. We need to execute login only once if we are simulating shift duration. Here login related operations needs to be recorded. Since the bank executives login only once in their shift.

Action: All other bank executive repeated operations needs to be captured. And the login and logout operations should not be captured into action.

vuser_end: Most of the closure operations are done with vuser_end action. Here logout related operations needs to be recorded. Since the bank executives logout only once after his / her shift.