Approach to Create SAP GUI script with Load Runner 11.5
Improved VuGen have
Recording 64bit Applications.
Improved Correlations.
Integrating Virtualized Services .
Web Protocol Asynchronous Support.
Planning:
1 Plan the Features that need to be considered under Load Test.
Plan the Protocol that is essential.
3) Plan the statistics of responses.
4) Plan the statistics that need be parameterized and Looping.
5) Take the Bench Marks of the single user request and Responses.
6) Plan about dynamic data that need to seized and correlated for the successful running of VUGEN.
7) Plan for Control , the actual Load Test for VUser
1) Goal Oriented Scenario or a Manual scenario.
2) Select the Ram Up.
3) Execute the Test.
4) Analysis the results.
Integrating Virtualized Services :
Integrate with HP Service Virtualization, and use simulated services, to facilitate load testing business processes that contain services that are not readily available or too costly. As part of your performance test, you may want to test applications that depend on other services which are a part of your business scenario. Instead of loading actual services, you can use simulated services in your test run. The virtualized services are a simulation of actual services. To facilitate performance testing business processes that contain services that are not available, Performance Center integrates with HP Service Virtualization. Using simulated services in your test is helpful if using actual services involves an additional cost or requires the service of an application that is under development or inaccessible at the time when you run your performance test.
Improved VuGen have
Recording 64bit Applications.
Improved Correlations.
Integrating Virtualized Services .
Web Protocol Asynchronous Support.
Planning:
1 Plan the Features that need to be considered under Load Test.
Plan the Protocol that is essential.
3) Plan the statistics of responses.
4) Plan the statistics that need be parameterized and Looping.
5) Take the Bench Marks of the single user request and Responses.
6) Plan about dynamic data that need to seized and correlated for the successful running of VUGEN.
7) Plan for Control , the actual Load Test for VUser
1) Goal Oriented Scenario or a Manual scenario.
2) Select the Ram Up.
3) Execute the Test.
4) Analysis the results.
Scripting:
Scripting:
Record the Script.
Divide the script into Action and Name them.
Ex : Login_Admin , Search_10_Users, Update_5_Users , Logout_Admin.
Enhance the script (Parameterization, Inbuilt Function, Logic)
Correlation if needed. (If it is a SAP WEB script).
Run The Script: Mark the Truncation Times , make sure it not Failing .
Define Run logic (hierarchy of Blocks and Actions and number of interactions for both Actions and Blocks).
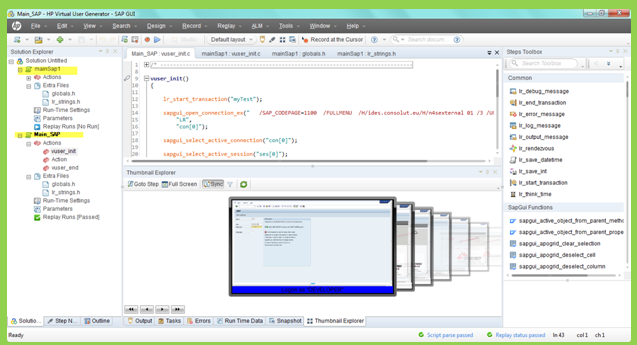
Approach to Create SAP GUI script
1) Select the protocol as “SAP GUI”.
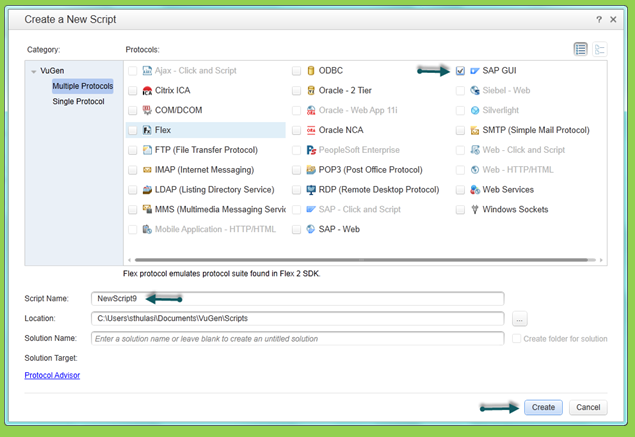
2) Hit on Record button to select “Windows”
Now provide the 'SAP Login' exe file path in below 'Application to record' field .
and then just place the cursor at Working Directory Test field and click.
Now you can see the “Start Recording” Button gets enabled.

3) Not hit “Start Recording” and log into the sap GUI and do the required truncations or action.
4) While recording divide the actions based on the functionality.
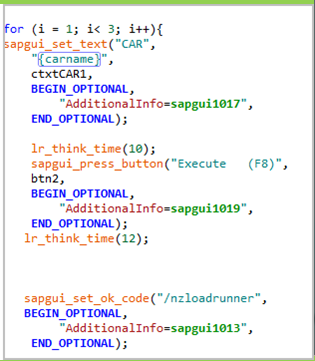
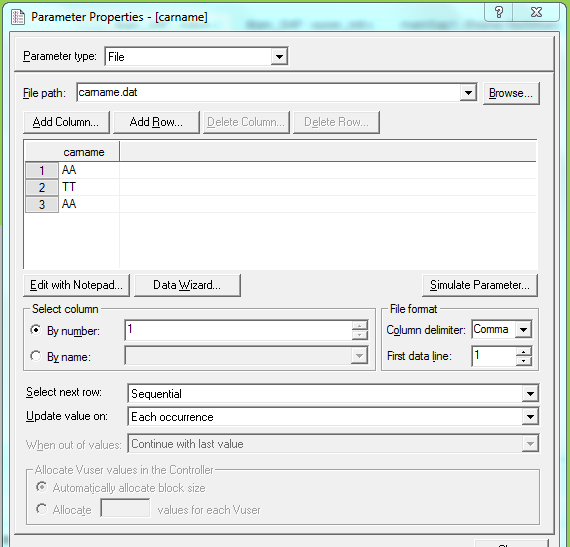
5) Parameterized the below value Carname as shown.
6) Used below functions to generate the sample script
/* -------------------------------------------------------------------------------
Script Title : SAP GUI sample
Script Description : Record and Play
Recorder Version : 2216
Created By : Saka Amar .
------------------------------------------------------------------------------- */
vuser_init()
{
sapgui_open_connection_ex(" /SAP_CODEPAGE=1100 /FULLMENU /H/ides.consolut.eu/H/n4sexternal 01 /3 /UPDOWNLOAD_CP=2",
"LR",
"con[2]");
sapgui_select_active_connection("con[2]");
sapgui_select_active_session("ses[0]");
sapgui_select_active_window("wnd[0]");
sapgui_window_resize("187",
"25",
BEGIN_OPTIONAL,
"AdditionalInfo=sapgui104",
END_OPTIONAL);
/*Before running script, enter password in place of asterisks in logon function*/
lr_think_time(25);
sapgui_logon("DEVELOPER",
"qtbg",
"500",
"EN",
BEGIN_OPTIONAL,
"AdditionalInfo=sapgui1015",
END_OPTIONAL);
lr_think_time(8);
sapgui_set_ok_code("/OSE93",
BEGIN_OPTIONAL,
"AdditionalInfo=sapgui1016",
END_OPTIONAL);
sapgui_press_button("Enter",
btn1,
BEGIN_OPTIONAL,
"AdditionalInfo=sapgui1017",
END_OPTIONAL);
sapgui_select_active_session("ses[1]");
sapgui_select_active_window("wnd[0]");
sapgui_window_resize("187",
"25",
BEGIN_OPTIONAL,
"AdditionalInfo=sapgui204",
END_OPTIONAL);
sapgui_send_vkey(F4,
BEGIN_OPTIONAL,
"AdditionalInfo=sapgui205",
END_OPTIONAL);
sapgui_select_active_window("wnd[1]");
sapgui_window_scroll_to_row("0",
BEGIN_OPTIONAL,
"AdditionalInfo=sapgui209",
END_OPTIONAL);
sapgui_set_focus(lbl1,
BEGIN_OPTIONAL,
"AdditionalInfo=sapgui208",
END_OPTIONAL);
sapgui_send_vkey(F2,
BEGIN_OPTIONAL,
"AdditionalInfo=sapgui2012",
END_OPTIONAL);
sapgui_select_active_window("wnd[0]");
sapgui_press_button(" Display",
btn2,
BEGIN_OPTIONAL,
"AdditionalInfo=sapgui2015",
END_OPTIONAL);
lr_think_time(8);
sapgui_press_button("Test (F8)",
btn3,
BEGIN_OPTIONAL,
"AdditionalInfo=sapgui2018",
END_OPTIONAL);
sapgui_send_vkey(F4,
BEGIN_OPTIONAL,
"AdditionalInfo=sapgui2021",
END_OPTIONAL);
sapgui_select_active_window("wnd[1]");
sapgui_window_scroll_to_row("0",
BEGIN_OPTIONAL,
"AdditionalInfo=sapgui2025",
END_OPTIONAL);
sapgui_set_focus(lbl2,
BEGIN_OPTIONAL,
"AdditionalInfo=sapgui2024",
END_OPTIONAL);
sapgui_send_vkey(F2,
BEGIN_OPTIONAL,
"AdditionalInfo=sapgui2028",
END_OPTIONAL);
sapgui_select_active_window("wnd[0]");
sapgui_press_button(" Display",
btn2,
BEGIN_OPTIONAL,
"AdditionalInfo=sapgui2031",
END_OPTIONAL);
sapgui_status_bar_get_text("paramStatusBarText",
BEGIN_OPTIONAL,
"Recorded status bar text: Fill in all required entry fields",
"AdditionalInfo=sapgui2034",
END_OPTIONAL);
sapgui_send_vkey(F4,
BEGIN_OPTIONAL,
"AdditionalInfo=sapgui2035",
END_OPTIONAL);
sapgui_select_active_window("wnd[1]");
sapgui_window_close(
BEGIN_OPTIONAL,
"AdditionalInfo=sapgui2038",
END_OPTIONAL);
lr_think_time(5);
sapgui_select_active_window("wnd[0]");
sapgui_set_ok_code("/OSE93",
BEGIN_OPTIONAL,
"AdditionalInfo=sapgui2041",
END_OPTIONAL);
sapgui_press_button(" Display",
btn2,
BEGIN_OPTIONAL,
"AdditionalInfo=sapgui2042",
END_OPTIONAL);
sapgui_status_bar_get_text("paramStatusBarText",
BEGIN_OPTIONAL,
"Recorded status bar text: Fill in all required entry fields",
"AdditionalInfo=sapgui2045",
END_OPTIONAL);
sapgui_set_ok_code("/OSE93",
BEGIN_OPTIONAL,
"AdditionalInfo=sapgui2046",
END_OPTIONAL);
sapgui_press_button("Enter",
btn1,
BEGIN_OPTIONAL,
"AdditionalInfo=sapgui2047",
END_OPTIONAL);
sapgui_select_active_session("ses[2]");
sapgui_select_active_window("wnd[0]");
sapgui_window_resize("187",
"25",
BEGIN_OPTIONAL,
"AdditionalInfo=sapgui304",
END_OPTIONAL);
lr_think_time(10);
sapgui_set_text("Transaction Code",
"ZALV_REPORT",
ctxtTSTC1,
BEGIN_OPTIONAL,
"AdditionalInfo=sapgui305",
END_OPTIONAL);
sapgui_press_button(" Display",
btn2,
BEGIN_OPTIONAL,
"AdditionalInfo=sapgui307",
END_OPTIONAL);
lr_think_time(4);
sapgui_press_button("Test (F8)",
btn3,
BEGIN_OPTIONAL,
"AdditionalInfo=sapgui3010",
END_OPTIONAL);
sapgui_grid_select_cell_row("5",
shell1,
"5",
BEGIN_OPTIONAL,
"AdditionalInfo=sapgui3013",
END_OPTIONAL);
sapgui_grid_select_rows("5",
shell1,
"5",
BEGIN_OPTIONAL,
"AdditionalInfo=sapgui3014",
END_OPTIONAL);
sapgui_grid_double_click_current_cell("(5, Airline Code)",
shell1,
BEGIN_OPTIONAL,
"CurrentRow=5",
"CurrentCell=CARRID",
"AdditionalInfo=sapgui3015",
END_OPTIONAL);
sapgui_grid_select_cell_row("10",
shell1,
"10",
BEGIN_OPTIONAL,
"AdditionalInfo=sapgui3018",
END_OPTIONAL);
sapgui_grid_select_rows("10",
shell1,
"10",
BEGIN_OPTIONAL,
"AdditionalInfo=sapgui3019",
END_OPTIONAL);
sapgui_grid_double_click_current_cell("(10, Airline Code)",
shell1,
BEGIN_OPTIONAL,
"CurrentRow=10",
"CurrentCell=CARRID",
"AdditionalInfo=sapgui3020",
END_OPTIONAL);
sapgui_grid_select_cell_row("16",
shell1,
"16",
BEGIN_OPTIONAL,
"AdditionalInfo=sapgui3023",
END_OPTIONAL);
sapgui_grid_select_rows("16",
shell1,
"16",
BEGIN_OPTIONAL,
"AdditionalInfo=sapgui3024",
END_OPTIONAL);
sapgui_grid_double_click_current_cell("(16, Airline Code)",
shell1,
BEGIN_OPTIONAL,
"CurrentRow=16",
"CurrentCell=CARRID",
"AdditionalInfo=sapgui3025",
END_OPTIONAL);
lr_think_time(10);
sapgui_press_button("Sort in Ascending Order (Ctrl+F4)",
btn4,
BEGIN_OPTIONAL,
"AdditionalInfo=sapgui3028",
END_OPTIONAL);
lr_think_time(9);
sapgui_select_active_window("wnd[1]");
sapgui_press_button("Add Sort Criterion (F7)",
btnAPP_WL_SING1,
BEGIN_OPTIONAL,
"AdditionalInfo=sapgui3031",
END_OPTIONAL);
lr_think_time(4);
sapgui_press_button("Transfer (Enter)",
btn1,
BEGIN_OPTIONAL,
"AdditionalInfo=sapgui3034",
END_OPTIONAL);
lr_think_time(6);
sapgui_select_active_window("wnd[0]");
sapgui_press_button("Sort in Ascending Order (Ctrl+F4)",
btn4,
BEGIN_OPTIONAL,
"AdditionalInfo=sapgui3037",
END_OPTIONAL);
sapgui_select_active_window("wnd[1]");
sapgui_grid_select_rows("'Column Set', 0",
shell2,
"0",
BEGIN_OPTIONAL,
"AdditionalInfo=sapgui3040",
END_OPTIONAL);
sapgui_press_button("Add Sort Criterion (F7)",
btnAPP_WL_SING1,
BEGIN_OPTIONAL,
"AdditionalInfo=sapgui3041",
END_OPTIONAL);
sapgui_press_button("Transfer (Enter)",
btn1,
BEGIN_OPTIONAL,
"AdditionalInfo=sapgui3044",
END_OPTIONAL);
lr_think_time(7);
sapgui_select_active_window("wnd[0]");
sapgui_press_button("Sort in Ascending Order (Ctrl+F4)",
btn4,
BEGIN_OPTIONAL,
"AdditionalInfo=sapgui3047",
END_OPTIONAL);
sapgui_select_active_window("wnd[1]");
sapgui_grid_select_cell("'Sort criteria' (1, @3F@)",
shell3,
"1",
"DOWN",
BEGIN_OPTIONAL,
"AdditionalInfo=sapgui3050",
END_OPTIONAL);
sapgui_grid_select_rows("'Sort criteria', 1",
shell3,
"1",
BEGIN_OPTIONAL,
"AdditionalInfo=sapgui3051",
END_OPTIONAL);
sapgui_grid_click_current_cell("'Sort criteria' (1, @3F@)",
shell3,
BEGIN_OPTIONAL,
"CurrentRow=1",
"CurrentCell=DOWN",
"AdditionalInfo=sapgui3052",
END_OPTIONAL);
sapgui_press_button("Transfer (Enter)",
btn1,
BEGIN_OPTIONAL,
"AdditionalInfo=sapgui3055",
END_OPTIONAL);
return 0;
}
Improved VuGen:
The VuGen user interface has been improved and enhanced to provide a more flexible and customizable user experience. An all new IDE makes LoadRunner scripting easier and more productive.
New look and feel – Flexible panes, layouts, and more
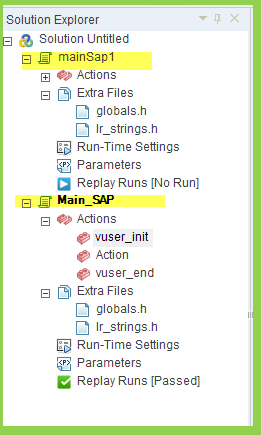
Solution Explorer – An easier way to group multiple scripts, access script items, and perform script-related operations.
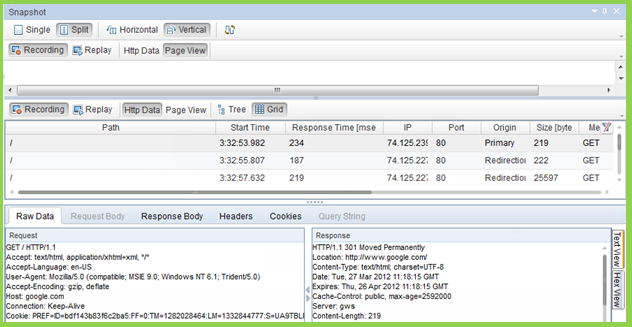
Snapshots – Multiple views, improved performance, snapshot synchronization, and search functionality.
Improved editor – Context-sensitive support, code completion support, and provides enhanced coloring and formatting.
Debugger – Real C language debugger.
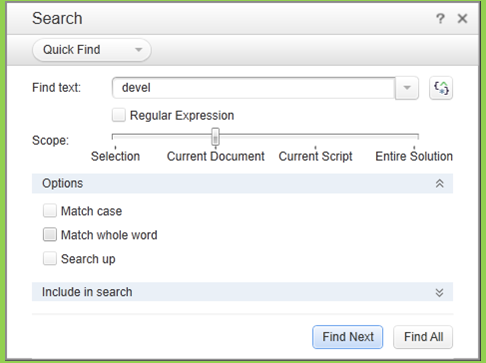
Search and replace – New capabilities include search in log and snapshots.
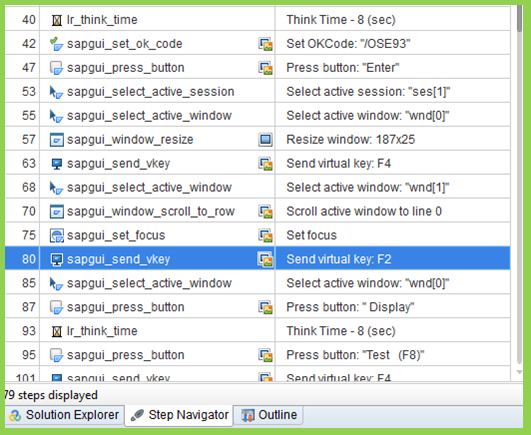
Step navigator – The new Step Navigator replaces the tree view, providing a single view of the script with easy filtering and search mechanisms.
New panes – Errors, Tasks, and Bookmarks panes display all errors, messages, and tags in simple, easy to locate views.
Join the Community – Community integration provides easy access to conversations and threads in the HP Software Community.
Improved Correlations:
A new response correlation capability has been added so correlation is easier and faster. Correlations can now be found based on server responses during recording, in many cases eliminating the need to replay iteratively to find dynamic values. Coupling this with the new Correlation Studio interface and new APIs for locating parameters based on XPath and Regular Expressions, makes scripting easier and faster
Recording 64bit Applications :
Recording of 64bit applications has been added to the existing support for 64bit operating systems. 64bit applications can usually be recognized when the ‘*32’ suffix is not displayed in the Windows Task Manager for their process. Replay is in 32bit.
Scripting:
Record the Script.
Divide the script into Action and Name them.
Ex : Login_Admin , Search_10_Users, Update_5_Users , Logout_Admin.
Enhance the script (Parameterization, Inbuilt Function, Logic)
Correlation if needed. (If it is a SAP WEB script).
Run The Script: Mark the Truncation Times , make sure it not Failing .
Define Run logic (hierarchy of Blocks and Actions and number of interactions for both Actions and Blocks).
Approach to Create SAP GUI script
1) Select the protocol as “SAP GUI”.

2) Hit on Record button to select “Windows”
Now provide the 'SAP Login' exe file path in below 'Application to record' field .
and then just place the cursor at Working Directory Test field and click.
Now you can see the “Start Recording” Button gets enabled.

3) Not hit “Start Recording” and log into the sap GUI and do the required truncations or action.
4) While recording divide the actions based on the functionality.
5) Parameterized the below value Carname as shown.


6) Used below functions to generate the sample script
/* -------------------------------------------------------------------------------
Script Title : SAP GUI sample
Script Description : Record and Play
Recorder Version : 2216
Created By : Saka Amar .
------------------------------------------------------------------------------- */
vuser_init()
{
sapgui_open_connection_ex(" /SAP_CODEPAGE=1100 /FULLMENU /H/ides.consolut.eu/H/n4sexternal 01 /3 /UPDOWNLOAD_CP=2",
"LR",
"con[2]");
sapgui_select_active_connection("con[2]");
sapgui_select_active_session("ses[0]");
sapgui_select_active_window("wnd[0]");
sapgui_window_resize("187",
"25",
BEGIN_OPTIONAL,
"AdditionalInfo=sapgui104",
END_OPTIONAL);
/*Before running script, enter password in place of asterisks in logon function*/
lr_think_time(25);
sapgui_logon("DEVELOPER",
"qtbg",
"500",
"EN",
BEGIN_OPTIONAL,
"AdditionalInfo=sapgui1015",
END_OPTIONAL);
lr_think_time(8);
sapgui_set_ok_code("/OSE93",
BEGIN_OPTIONAL,
"AdditionalInfo=sapgui1016",
END_OPTIONAL);
sapgui_press_button("Enter",
btn1,
BEGIN_OPTIONAL,
"AdditionalInfo=sapgui1017",
END_OPTIONAL);
sapgui_select_active_session("ses[1]");
sapgui_select_active_window("wnd[0]");
sapgui_window_resize("187",
"25",
BEGIN_OPTIONAL,
"AdditionalInfo=sapgui204",
END_OPTIONAL);
sapgui_send_vkey(F4,
BEGIN_OPTIONAL,
"AdditionalInfo=sapgui205",
END_OPTIONAL);
sapgui_select_active_window("wnd[1]");
sapgui_window_scroll_to_row("0",
BEGIN_OPTIONAL,
"AdditionalInfo=sapgui209",
END_OPTIONAL);
sapgui_set_focus(lbl1,
BEGIN_OPTIONAL,
"AdditionalInfo=sapgui208",
END_OPTIONAL);
sapgui_send_vkey(F2,
BEGIN_OPTIONAL,
"AdditionalInfo=sapgui2012",
END_OPTIONAL);
sapgui_select_active_window("wnd[0]");
sapgui_press_button(" Display",
btn2,
BEGIN_OPTIONAL,
"AdditionalInfo=sapgui2015",
END_OPTIONAL);
lr_think_time(8);
sapgui_press_button("Test (F8)",
btn3,
BEGIN_OPTIONAL,
"AdditionalInfo=sapgui2018",
END_OPTIONAL);
sapgui_send_vkey(F4,
BEGIN_OPTIONAL,
"AdditionalInfo=sapgui2021",
END_OPTIONAL);
sapgui_select_active_window("wnd[1]");
sapgui_window_scroll_to_row("0",
BEGIN_OPTIONAL,
"AdditionalInfo=sapgui2025",
END_OPTIONAL);
sapgui_set_focus(lbl2,
BEGIN_OPTIONAL,
"AdditionalInfo=sapgui2024",
END_OPTIONAL);
sapgui_send_vkey(F2,
BEGIN_OPTIONAL,
"AdditionalInfo=sapgui2028",
END_OPTIONAL);
sapgui_select_active_window("wnd[0]");
sapgui_press_button(" Display",
btn2,
BEGIN_OPTIONAL,
"AdditionalInfo=sapgui2031",
END_OPTIONAL);
sapgui_status_bar_get_text("paramStatusBarText",
BEGIN_OPTIONAL,
"Recorded status bar text: Fill in all required entry fields",
"AdditionalInfo=sapgui2034",
END_OPTIONAL);
sapgui_send_vkey(F4,
BEGIN_OPTIONAL,
"AdditionalInfo=sapgui2035",
END_OPTIONAL);
sapgui_select_active_window("wnd[1]");
sapgui_window_close(
BEGIN_OPTIONAL,
"AdditionalInfo=sapgui2038",
END_OPTIONAL);
lr_think_time(5);
sapgui_select_active_window("wnd[0]");
sapgui_set_ok_code("/OSE93",
BEGIN_OPTIONAL,
"AdditionalInfo=sapgui2041",
END_OPTIONAL);
sapgui_press_button(" Display",
btn2,
BEGIN_OPTIONAL,
"AdditionalInfo=sapgui2042",
END_OPTIONAL);
sapgui_status_bar_get_text("paramStatusBarText",
BEGIN_OPTIONAL,
"Recorded status bar text: Fill in all required entry fields",
"AdditionalInfo=sapgui2045",
END_OPTIONAL);
sapgui_set_ok_code("/OSE93",
BEGIN_OPTIONAL,
"AdditionalInfo=sapgui2046",
END_OPTIONAL);
sapgui_press_button("Enter",
btn1,
BEGIN_OPTIONAL,
"AdditionalInfo=sapgui2047",
END_OPTIONAL);
sapgui_select_active_session("ses[2]");
sapgui_select_active_window("wnd[0]");
sapgui_window_resize("187",
"25",
BEGIN_OPTIONAL,
"AdditionalInfo=sapgui304",
END_OPTIONAL);
lr_think_time(10);
sapgui_set_text("Transaction Code",
"ZALV_REPORT",
ctxtTSTC1,
BEGIN_OPTIONAL,
"AdditionalInfo=sapgui305",
END_OPTIONAL);
sapgui_press_button(" Display",
btn2,
BEGIN_OPTIONAL,
"AdditionalInfo=sapgui307",
END_OPTIONAL);
lr_think_time(4);
sapgui_press_button("Test (F8)",
btn3,
BEGIN_OPTIONAL,
"AdditionalInfo=sapgui3010",
END_OPTIONAL);
sapgui_grid_select_cell_row("5",
shell1,
"5",
BEGIN_OPTIONAL,
"AdditionalInfo=sapgui3013",
END_OPTIONAL);
sapgui_grid_select_rows("5",
shell1,
"5",
BEGIN_OPTIONAL,
"AdditionalInfo=sapgui3014",
END_OPTIONAL);
sapgui_grid_double_click_current_cell("(5, Airline Code)",
shell1,
BEGIN_OPTIONAL,
"CurrentRow=5",
"CurrentCell=CARRID",
"AdditionalInfo=sapgui3015",
END_OPTIONAL);
sapgui_grid_select_cell_row("10",
shell1,
"10",
BEGIN_OPTIONAL,
"AdditionalInfo=sapgui3018",
END_OPTIONAL);
sapgui_grid_select_rows("10",
shell1,
"10",
BEGIN_OPTIONAL,
"AdditionalInfo=sapgui3019",
END_OPTIONAL);
sapgui_grid_double_click_current_cell("(10, Airline Code)",
shell1,
BEGIN_OPTIONAL,
"CurrentRow=10",
"CurrentCell=CARRID",
"AdditionalInfo=sapgui3020",
END_OPTIONAL);
sapgui_grid_select_cell_row("16",
shell1,
"16",
BEGIN_OPTIONAL,
"AdditionalInfo=sapgui3023",
END_OPTIONAL);
sapgui_grid_select_rows("16",
shell1,
"16",
BEGIN_OPTIONAL,
"AdditionalInfo=sapgui3024",
END_OPTIONAL);
sapgui_grid_double_click_current_cell("(16, Airline Code)",
shell1,
BEGIN_OPTIONAL,
"CurrentRow=16",
"CurrentCell=CARRID",
"AdditionalInfo=sapgui3025",
END_OPTIONAL);
lr_think_time(10);
sapgui_press_button("Sort in Ascending Order (Ctrl+F4)",
btn4,
BEGIN_OPTIONAL,
"AdditionalInfo=sapgui3028",
END_OPTIONAL);
lr_think_time(9);
sapgui_select_active_window("wnd[1]");
sapgui_press_button("Add Sort Criterion (F7)",
btnAPP_WL_SING1,
BEGIN_OPTIONAL,
"AdditionalInfo=sapgui3031",
END_OPTIONAL);
lr_think_time(4);
sapgui_press_button("Transfer (Enter)",
btn1,
BEGIN_OPTIONAL,
"AdditionalInfo=sapgui3034",
END_OPTIONAL);
lr_think_time(6);
sapgui_select_active_window("wnd[0]");
sapgui_press_button("Sort in Ascending Order (Ctrl+F4)",
btn4,
BEGIN_OPTIONAL,
"AdditionalInfo=sapgui3037",
END_OPTIONAL);
sapgui_select_active_window("wnd[1]");
sapgui_grid_select_rows("'Column Set', 0",
shell2,
"0",
BEGIN_OPTIONAL,
"AdditionalInfo=sapgui3040",
END_OPTIONAL);
sapgui_press_button("Add Sort Criterion (F7)",
btnAPP_WL_SING1,
BEGIN_OPTIONAL,
"AdditionalInfo=sapgui3041",
END_OPTIONAL);
sapgui_press_button("Transfer (Enter)",
btn1,
BEGIN_OPTIONAL,
"AdditionalInfo=sapgui3044",
END_OPTIONAL);
lr_think_time(7);
sapgui_select_active_window("wnd[0]");
sapgui_press_button("Sort in Ascending Order (Ctrl+F4)",
btn4,
BEGIN_OPTIONAL,
"AdditionalInfo=sapgui3047",
END_OPTIONAL);
sapgui_select_active_window("wnd[1]");
sapgui_grid_select_cell("'Sort criteria' (1, @3F@)",
shell3,
"1",
"DOWN",
BEGIN_OPTIONAL,
"AdditionalInfo=sapgui3050",
END_OPTIONAL);
sapgui_grid_select_rows("'Sort criteria', 1",
shell3,
"1",
BEGIN_OPTIONAL,
"AdditionalInfo=sapgui3051",
END_OPTIONAL);
sapgui_grid_click_current_cell("'Sort criteria' (1, @3F@)",
shell3,
BEGIN_OPTIONAL,
"CurrentRow=1",
"CurrentCell=DOWN",
"AdditionalInfo=sapgui3052",
END_OPTIONAL);
sapgui_press_button("Transfer (Enter)",
btn1,
BEGIN_OPTIONAL,
"AdditionalInfo=sapgui3055",
END_OPTIONAL);
return 0;
}
Improved VuGen:
The VuGen user interface has been improved and enhanced to provide a more flexible and customizable user experience. An all new IDE makes LoadRunner scripting easier and more productive.
New look and feel – Flexible panes, layouts, and more
Solution Explorer – An easier way to group multiple scripts, access script items, and perform script-related operations.

Snapshots – Multiple views, improved performance, snapshot synchronization, and search functionality.

Improved editor – Context-sensitive support, code completion support, and provides enhanced coloring and formatting.
Debugger – Real C language debugger.
Search and replace – New capabilities include search in log and snapshots.

Step navigator – The new Step Navigator replaces the tree view, providing a single view of the script with easy filtering and search mechanisms.

New panes – Errors, Tasks, and Bookmarks panes display all errors, messages, and tags in simple, easy to locate views.

Join the Community – Community integration provides easy access to conversations and threads in the HP Software Community.
Improved Correlations:
A new response correlation capability has been added so correlation is easier and faster. Correlations can now be found based on server responses during recording, in many cases eliminating the need to replay iteratively to find dynamic values. Coupling this with the new Correlation Studio interface and new APIs for locating parameters based on XPath and Regular Expressions, makes scripting easier and faster
Recording 64bit Applications :
Recording of 64bit applications has been added to the existing support for 64bit operating systems. 64bit applications can usually be recognized when the ‘*32’ suffix is not displayed in the Windows Task Manager for their process. Replay is in 32bit.
Integrating Virtualized Services :
Integrate with HP Service Virtualization, and use simulated services, to facilitate load testing business processes that contain services that are not readily available or too costly. As part of your performance test, you may want to test applications that depend on other services which are a part of your business scenario. Instead of loading actual services, you can use simulated services in your test run. The virtualized services are a simulation of actual services. To facilitate performance testing business processes that contain services that are not available, Performance Center integrates with HP Service Virtualization. Using simulated services in your test is helpful if using actual services involves an additional cost or requires the service of an application that is under development or inaccessible at the time when you run your performance test.
Web Protocol Asynchronous Support :
Support for asynchronous behavior has been added. This new capability enables recording of Poll, Long Poll, and Push interactions.
Advanced Web applications contain a lot of asynchronous communication designed to keep information current and up to date. Applications such as chat, messaging, stock tickers, and news updates all use various asynchronous mechanisms such Poll, Long Poll, and Push to maintain data. Support for these mechanisms has been added to Web (HTTP/HTML) Vuser scripts, and web-based functions inside Flex, Silverlight, and Web Services Vuser scripts. These unique communication patterns are recognized automatically and the recorded script is updated accordingly.

